


 November 30th, 2019
  doreen.co
 The flu can become pneumonia. In fact, about one-third of all pneumonia cases in this country are caused by respiratory viruses, most commonly influenza. As Jason Turowski, MD, a pulmonologist at Cleveland Clinic, puts it, “viruses set up shop and basically wreak havoc on your lungs.” Besides influenza, other causes of pneumonia include bacteria and, less commonly, fungi or parasites.
Pneumonia, an infection that causes inflammation in the lungs, affects millions of Americans each year. It is often mild and generally responds well to treatment, but it can be life-threatening, especially for the very young, the elderly, and people with chronic conditions.
Pneumonia, an infection that causes inflammation in the lungs, affects millions of Americans each year. It is often mild and generally responds well to treatment, but it can be life-threatening, especially for the very young, the elderly, and people with chronic conditions.
“The lung is a large organ, and it’s a vital organ,” says Gerard Criner, MD, co-director of the Center for Inflammation, Translational and Clinical Lung Research at Temple University School of Medicine in Philadelphia. “If it gets infected and it compromises the primary function to support ventilation, that’s a big contributor to morbidity and mortality.”
Once pneumonia-causing organisms invade lung tissues, air sacs in the lungs called alveoli fill up with fluids and pus, making it hard to breathe. Symptoms include cough, fever, fatigue, and nausea. Other conditions such as chronic obstructive pulmonary disease (COPD) raise the risk of developing pneumonia.
Pneumonia is an infection that causes inflammation in your lungs. The three main causes of pneumonia are bacteria, fungi, or viruses. Viral pneumonia is a complication of the viruses that cause colds and the flu. The virus invades your lungs and causes them to swell and block your flow of oxygen
Postural Drainage, Clapping and Vibration is a method for clearing the lungs by changing position. It allows gravity to help drain the mucous to the top of the lungs where it can be removed more easily. It can be an important way to prevent pneumonia. For example, as soon as a person shows signs of getting a cold or has flu-like feelings, postural drainage and increased fluids should be started to prevent more serious lung infections.
This method and the specific positions should be discussed with your doctor first. Do not do this if it makes breathing harder or if it affects the heart rate.
Clapping and vibration may be added to the postural drainage routine. This will help loosen the mucous by shaking it loose. It helps the mucous move from the small air sacs to the larger airways where it can be coughed or suctioned out. Clapping and vibration are done when the person is placed in certain postural drainage positions.
How do I do postural drainage?
 For best results, postural drainage, clapping and vibration should be done regularly in order to prevent serious infections like pneumonia. This is also a good time for a person to do deep breathing exercises or incentive spirometry. All of these practices help keep the lungs healthy. Keep in mind that these positions are the “ideal.” Due to the type of injury or spasms, there may be limitations on positioning. Do the best that you can.
Step 1: Feel the chest.
The chest should be felt to see where the mucous is located. For example, you may feel “rattling” in the upper parts of the chest or only in the back. Each person and each day may be different. Mucous can move around, so it is important that you check each time you do this.
Step 2: Position correctly.
Place the person in the position that relates best to the location of the mucous. See below.
Congestion in the lower back part of the lungs:
To drain the lungs in the lower back, the person should lie face down (prone) with the hips propped up with pillows. The hips should be propped up about 18-20 inches as shown below. If using a hospital bed, it is also possible to lower the head of the bed while the hips are propped. Check with your doctor first before lowering the bed.
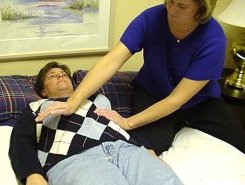
Congestion in the bottom front part of the lungs:
To drain the bottom front parts of the lungs, the person should lie on his/her back with the hips propped up on pillows. The hips should be propped up about 18 -20 inches.
If using a hospital bed, it is also possible to lower the head of the bed while the hips are propped. Check with your doctor first before lowering the bed.
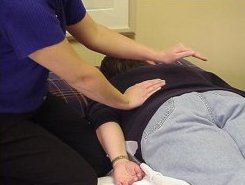
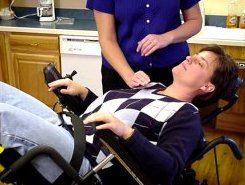
Congestion in the upper front part of the lungs:
To drain the upper front part of the lungs, the person should be sitting up and leaning back.
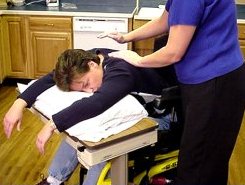
Congestion in the upper back part of the lungs:
To drain the upper back part of the lungs, the person should be sitting up and leaning slightly forward.
Congestion in the bottom parts of the lungs:
To drain the bottom part of the right lung, lay flat on your left side. Proper pillow placement is important to protect the skin. The hips should be propped up about 18 –20 inches. If using a hospital bed, it is also possible to lower the head of the bed while the hips are propped. Check with your doctor first before lowering the bed.
To drain the bottom part of the left lung, lay flat on your right side. Position yourself as in the photo, but rest on your right side.
Step 3: Let the lungs drain
Stay in the prescribed position for 15 – 20 minutes. You may use more than one position depending on where the chest congestion is located. For example, there may be congestion in the upper front and upper back parts of the lungs. In that case, have the person sit up and lean forward for 10 minutes and then lean backwards slightly for another 10 minutes. It is helpful to do breathing exercises during this drainage time. If a person has to be in more than one position, it is important to help the person cough or suction in between each position. For example, after the first position, the person may need an assist cough before being placed in the second position.
Step 4: Perform clapping if needed.
How do I do clapping?
Clapping may be added to the postural drainage. It is used to loosen the mucous by shaking it loose. It helps the mucous move from the small air sacs to the larger airways where it can be coughed or suctioned out.
Clapping is done when the person is already in a specific postural drainage position. Never clap over the spine, kidneys or lower part of the back on each side, or on the breasts or stomach. Always stop clapping while the person is coughing.
Step 1: Cup the hands
The hands should be held in a cup shape formed by the fingers and the thumb.
Step 2: Begin Clapping
Keep in mind that the person should already be positioned from postural drainage.
Clap gently with the cupped hand for 3 – 5 minutes over the congested area. This should be done with a smooth rhythm. Remember to stop if the person starts coughing. Refer to the following positions and clap over the highlighted areas of the chest.
Position A
Clap from below the shoulder blades to about 3 inches above the bottom of the ribs.
Do not clap over the backbone or kidneys.
Position B
Clap from below the nipple line to the bottom of the ribs. Do not clap over the stomach.
 Position C
Clap directly under the collarbone.
How do I do vibration?
Vibration may also be used to loosen mucous. You can do this as follows:
Step 1 Place one hand flat on the congested part of the chest and the other on the top of the first hand.
Step 2 Have the person take in a breath slowly and deeply.
Step 3 Have the person breathe OUT slowly through pursed lips.
Step 4 While the person is breathing OUT, vibrate your hands on the congested part of the chest. Vibrate the area at least 3 times, then assist cough the person. When vibrating, it is important to keep the muscles of the arms and hands tense. Apply pressure downward and vibrate hands and arms.
 Posted in


 HMI Private Practice of Hypnotherapy Provider
Primary specialty: Alternative Medicine
Secondary speciality: Behavior Therapy
Doreen is an
Honors Graduate of HMI and also a Certified Practitioner /Facilitator of The Melchizedek MethodT (incorporating the Hologramof Love Merkaba). Energy Healer since August 1999, she was healedfrom a car accident preventing back surgery and being able toeliminate her back pain with hypnotherapy and energyhealing
Doreen is an Honors Graduate of HMI and also a Certified Practitioner / Facilitator of The Melchizedek MethodT (incorporating the Hologram of Love Merkaba). Energy Healer since August 1999,...
HMI Private Practice of Hypnotherapy Provider
Primary specialty: Alternative Medicine
Secondary speciality: Behavior Therapy
Doreen is an
Honors Graduate of HMI and also a Certified Practitioner /Facilitator of The Melchizedek MethodT (incorporating the Hologramof Love Merkaba). Energy Healer since August 1999, she was healedfrom a car accident preventing back surgery and being able toeliminate her back pain with hypnotherapy and energyhealing
Doreen is an Honors Graduate of HMI and also a Certified Practitioner / Facilitator of The Melchizedek MethodT (incorporating the Hologram of Love Merkaba). Energy Healer since August 1999,...